New Ox Locker Shifter Installation
After installing three of the new Ox Locker Shifters I have to say up front, the Ox Trax folks got this right!!!
This is impressive folks, in machining, design and operations.
There are virtually no real adjustments with this new design. It is simple to install and presents you with an easy to use, spring-loaded movement of the shifter to engage the Ox Locker.
I can’t imagine anyone who can read a few simple directions having any difficulty installing or using the New Ox Locker Shifter.
Can you put two drops of medium strength Loctite on a set of threads?
Can you measure ½ inch between two parts?
Can you turn one threaded part on until it is just touching another part?
If yes then you have the ability to adjust and install the New Ox Shifter successfully.
It truly is that simple folks.
The new Ox Shifter Assembly comes with one page of instructions having five steps.
These worked just fine for me, but I do believe there is some opportunity to improve on the instructions a bit.
The instructions I have appear to be written for someone doing a completely new Ox Locker installation. They do not address a few things you will need to take care of if all you are doing is replacing your original Ox Shifter Assembly with the new assembly.
I also believe adding a few arrows and labels on the pictures to identify which parts are being addressed would be helpful.
With that said, here is my version of the installation instructions on “How to replace an existing Ox Shifter Assembly with the newly designed assembly.” (With pictures, arrows, labels and even my hand!)
The instructions that come with the shifter tell you up front,
“The installation of the shifter should be done after the cover is on the differential. Make sure you have already routed the cable and placed it near to where you are going to install it permanently.”
Set Screw
If you are going to be replacing your original shifter assembly with the new one, you will need to take the old shifter out.
Do you remember that little nylon set screw inside the shifter cross pin?
Make sure you loosen this first, before attempting to unscrew the shifter assembly from the cable. If you don’t you will end up unscrewing the inner cable rod from the shift fork inside the differential because the inner cable will turn along with the original shifter assembly you are trying to take out.
(Trust me on this, experience talking! I forgot to do this on the first unit.)
Loctite Inner Cable Rod
If you are not sure you have two and only two threads protruding from the inner cable rod through the shifter fork inside the differential, and you have not already put Loctite on these threads, do it now.
Do it right!
This is purely my advice.
Take the differential cover off, and remove the cable assembly.
Clean up the threads of the inner cable rod and shift fork inside the cover with brake cleaning fluid and let it evaporate.
Then apply two drops of medium strength Loctite to the threads of the inner cable rod and screw it into the shift fork. Make sure two threads are protruding past the end of the shift fork slider.
Why do you want to do this?
Well, the shifter fork slider can and does rotate freely. It is not directly attached to the shifter fork, but rather is held in place with two large “E-Clips”. Over time, it can and often does rotate. This will cause it to thread in or out on the inner cable rod.
The medium strength Loctite will prevent this from happening.
Put the differential cover on and route your cable to where the shifter will live and you are now ready to install the redesigned shifter assembly.
Many Ox Lockers were delivered to customers with an optional spring that was fit into the differential cover prior to installing the shifter cable.
The purpose of this spring was to give the shifter a spring load effect when trying to engage the locker when the engagement cams were not perfectly lined up.
Those who did not install this spring installed a small metal spacer in the cover prior to installing the cable.
If you have the spring in the differential cover you will need to remove it and replace it with the metal spacer, prior to installing the new design Ox Shifter Assembly.
Here is a picture of the spring that must be removed, and the spacer that must be put in place of the spring.
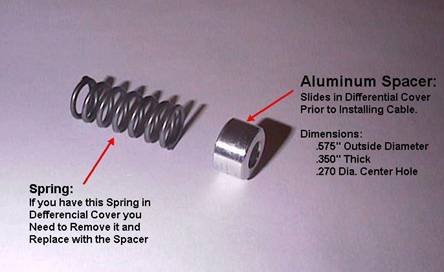
If you no longer have this spacer you can purchase one very similar in size at Ace Hardware for about 50 cents. (Note: Ace Hardware sells this “collar” with a setscrew in it. Take the setscrew out before using it.
Shifter Installation Instructions
BE SURE to put two washers between the upper Shifter Plate and the lower assembly to compensate for the thickness of your mounting bracket, prior to adjusting the new shifter. Find washers the same thickness as the mounting material. If you don’t the geometry will be off!
Here are some pictures to compare the original shifter to the new shifter. I have included some of my observations on the differences. There may indeed be other differences I have not noted.
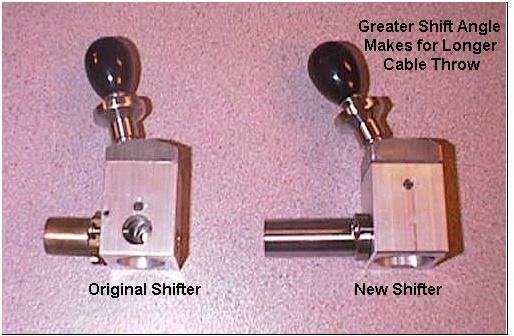
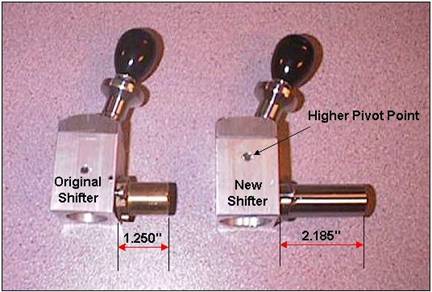
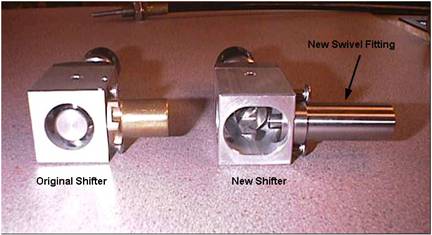
Here is a picture of the parts you are going to be working with.
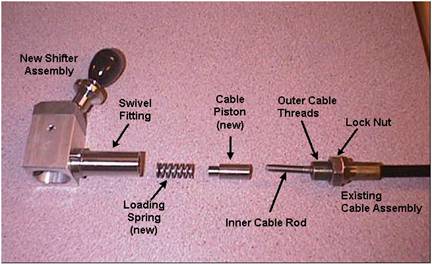
The newly designed shifter assembly has three parts: the Main Shifter, the Loading Spring, and the (inner) Cable (rod) Piston.
Put two drops of medium strength Loctite on the end of the threads of the inner cable rod and then screw the Cable Piston onto the Inner Cable.
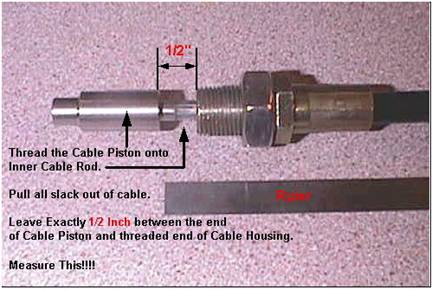
You want to leave ½ inch clearance between the end of the Cable Piston and the head of the Cable Housing.
Please measure this.
While I am showing a ruler in this picture I used a stainless steel radiator hose clamp, which measured exactly ½ inch wide, as a feeler gauge to get this measurement accurate. You might want to do the same.
Please be sure you get all the slack out of the cable.
Take a break for 10 minutes and let the Loctite set up.
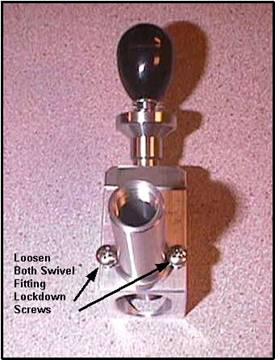
Loosen the two lockdown screws around the swivel fitting until the swivel fitting can be rotated freely. (Not too loose folks, just until you can turn it.)
Place the Shifter in the unlocked position, then place the Pressure Spring on the nipple at the end of the Cable Piston as shown in this picture.
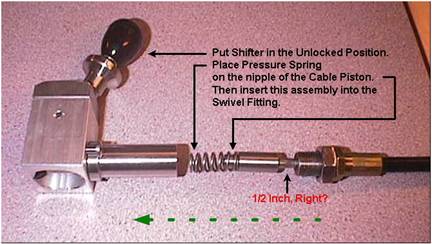
Insert the Pressure Spring, Cable Piston and Cable into the Swivel Fitting.
Turn the swivel fitting until it just begins to thread onto the outer Cable Fitting.
You are about ready to make the only real adjustment required for the New Ox Shifter Assembly.
Turn the shifter assembly upside down so you can see in the bottom of the unit.
Begin to thread the Swivel Fitting onto the outer Cable Fitting. You will see the shifter Inner Piston begin to extend. You should also see the Shifter Forks, which are at the bottom of the shifter rod.
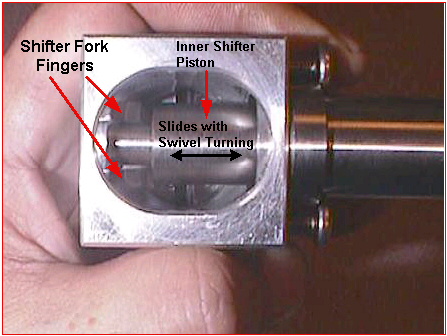
To make this adjustment you want to continue to thread the Swivel Fitting onto the Outer Cable Fitting until the “Shoulders” on the Inner Shifter Piston are just touching the Shifter Fork.
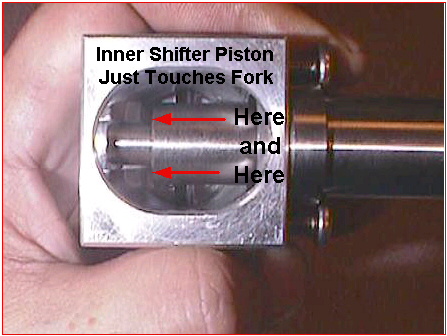
Shift the unit several times from unlocked to locked and back. Make sure the Inner Shifter Piston is still just touching the Shifter Fork.
When they are just touching, tighten down the two Swivel Fitting Lockdown Screws and the Outer Cable Lock Nut.
Please be sure you tighten the Lock Nut against the swivel fitting and not against the cable housing.
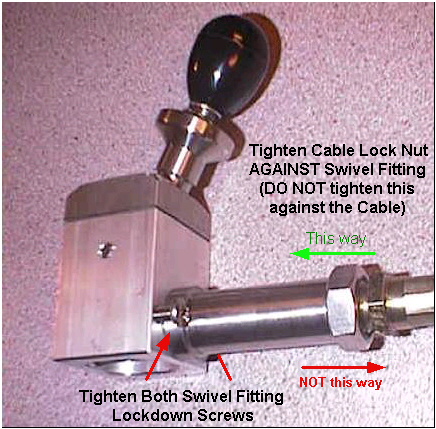
You’re basically done!
All that is left is to mount the New Ox Shifter Assembly in your vehicle. It mounts in exactly the same way as the original shifter. You should have no problems mounting the new shifter in the same holes you had the original shifter mounted in.
Unscrew the knob, remove the spring load detent and spring, remove the two top plate screws and remove the shifter top plate. Install the bottom of the shifter assembly and then replace the above parts in reverse order.
Then…….
Go Wheeling!
My name is Frank, and I go by Daless2 on the 4x4 forums.
Folks I am a Jeeper, like all of you, nothing more and nothing less.
I have no affiliation with the folks at OX Trax, or any of their distributors.
That said, I would be remiss if I did not comment on my experiences in getting help from Ox Trax and the distributor I always work with, Drivetrain Direct.
Both have provided, in my opinion, outstanding service and support in resolving passed issues I have had in helping a few other Jeepers out with their Ox Lockers.
I have never had any problems with my own Ox Locker.
(But for one minor problem I caused when locking the cable lock nut down in the wrong direction. Clearly my error.)
To date I have helped other Jeepers adjust 30 Ox Locker (original) Shifters. All but one were adjusted successfully and stayed in adjustment.
(Read that, “The old shifter worked great but was a bit difficult to adjust”.)
The issue with the one unit, which I could not adjust properly, has now been resolved. One of the “E-clips” that holds the shift fork rod to the shift fork was missing.
Why? I have no clue.
What I do know is that I had that cover off 10 times (if I did it once), and I should have found this much sooner. (Sorry! Several blonde days in a row I guess!)
Last week I installed three (3) of the new re-designed Ox Shifter Assembles, and I have to tell you, this IS the way to go.
If you have an interest in replacing your shifter to the new design I would suggest you call the DEALER you purchased your Ox Locker from, and discuss how you can get your hands on one (or two if you have two).
This document is being put out into the public domain. Anyone, may use this document (all or any parts) for the purpose of explaining how to install the new re-designed Ox Shifter Assembly.
Note: Date of the document is 07/02/2002. Please check for updates to this document at . This document can be downloaded in MS Word format from my rudimentary web site. Please look on my web site for any changes I may make from feedback I receive from others.
I would be happy to answer any questions you may have, or include any suggestions you might like to offer.
Anyone who would like to host this write-up on your web site is welcome to do so. Let me know if you do so I can point folks to it.
I hope some find this helpful.
Frank Daless2
I can be contacted at email.id@worldnet.att.net